How To Approach a Website Redesign [Full Process]

It can be sad to say goodbye to an old website. It’s your old shop window where customers used to go to check out your products or services and get to know your brand. But alas, websites can’t stay the same forever.

In a time of accelerated change in the online space, the lifespan for websites has become short, with the average lifespan for a modern website is 2 years 7 months.

But redesigning your website doesn’t need to be overly complicated and it doesn’t always need to be from the ground up.

Read on to see some of the reasons you should consider a website redesign and check out our process for making amazing customer-centric websites first time.

Why Should I Redesign my Website?

In many cases, this question answers itself when the situation arises. Some reasons are exciting, while others are responses to negative user reactions. Here are a few below:

  • The company is going through a rebrand
  • Too few conversions to your web forms or lead magnets
  • Analytics show low engagement: time on page and multi-page sessions
  • It’s missing functionality that you need access to
  • Users are bouncing from the site, indicating an unappealing or untrustworthy website (severity depends on other information)

In a website survey conducted by Goodfirms, the most common reason for a redesign project was low conversion rates, with high bounce rates, poor UX and a lack of device responsiveness following.

Want to know your experience better?

Get our expert set of eyes on your website to improve your user’s experience for the better.

Book your FREE Audit Call and Report

PixelTree’s Recommended Website Redesign Process

A website redesign doesn’t need to be complicated. In fact, a website redesign process can be condensed down to 7 steps:

  1. Conduct a UX audit and research gathering
  2. Outline your goals
  3. Make a strategy
  4. Wireframes
  5. Prototype building and conduct user testing
  6. Development, testing and launch
  7. On-going monitoring and feedback

1. Conduct a UX audit and research gathering

Conducting the redesign before knowing the problem is like opting for surgery before doing an x-ray (or equivalent based on the medical issue). You will spend more time and money solving the problem later, and, the person receiving the experience will not thank you.

That’s why we recommend you should first analyse the current state of your site through a UX audit. UX audits take a comprehensive review of your website, accounting for:

  • Measurable indicators like bounce rates, pages per session and conversions on page and content.
  • A qualitative review of heatmaps and recordings from users to identify navigating problems, functionality bugs and design inconsistencies.

Pairing the two, the UX audit will ultimately inform your next step, deciding whether you should:

  • Conduct a full redesign to address the issues found
  • Focus on making smaller improvements to the existing experience

This can be conducted by an internal team heuristically (so hands on going through the process) or via a specialist agency if needed.

2. Outline Your Goals

Once you know what’s hot and cold with your website, you should look at what you aim to do with this information. Creating goals sets the tone for your website redesign project, giving you focus on how your site should look and feel.

Note, when we say ‘goals’ we don’t mean ‘objectives’ (which are more measured), you need the broad vision for what you want the site to achieve.

Goals depend on why your redesigning your website, but could be:

  • To reflect the new brand direction across the site (colours, logos, layout)
  • Encourage longer time on the site
  • Harness different content types
  • Become mobile responsive
  • Increase on site engagement
  • Optimise conversions

Setting a core or combination of goals early also gives you the benefit of measuring performance, providing a benchmark for checking your output against your goals at the end of the project.

3. Make a Strategy

So, you’ve analysed your website to justify the redesign and have set goals to achieve, what’s next in the process?

This usually means creating a project plan including:

  • The scope of the redesign – Is it a few landing pages or the whole site?
  • A project timeline – Kanban boards and Ganntt charts are your friend here. Set times and tasks needed to meet your goals.
  • The budget – Time, resource, tools and external expertise needed. This should be costed and signed off by your finance or management team.
  • Objectives/KPIs – What are you going to measure your success on? Creating SMART objectives here need to link to your goals

4. Wireframes

Once you’ve decided on your strategy, it’s time to actually start applying your design magic.

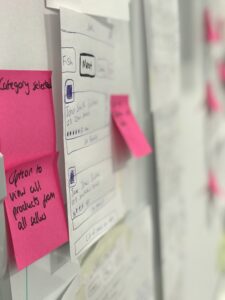
Wireframes are a great foundation for starting your redesign work. Not only do they only require the basics (you can draw them out using pencil and paper), they’re low risk and don’t require any expert knowledge to make.

Here you can experiment with image locations, navigation options and more until you find the perfect balance for UX and your goals.


Tip: Find Out What Works Elsewhere

When building a website, it’s okay to look at other people’s sites and get a view for what’s possible. Check out sites outside of your industry and see how they tackle big problems. Struggling to respond quickly to queries? Investigate how chatbots work on a particular website. Don’t know how you can embed lead magnets in your web page? Consider unintrusive pop-ups like HubSpot or static banners.


Tip: Discuss Feasibility with Developers

If you have a development whether internal or external, getting them involved can be useful to determine feasibility of your sketches before you commit to creating higher fidelity designs. For more information on design fidelity, check out our post here.

5. Build Your Prototypes and Conduct User Testing

The next logical step is to begin designing your wireframes in higher fidelity to resemble something closer to your planned masterpiece.

But you shouldn’t stop at plain design templates, no. That’s visual but it’s not testable. For the best results, you should build prototypes.

What’s the pros and cons between design templates and prototypes you ask?

Static Design Templates  Interactive Prototypes 
+ Display the visual layout of your intended webpages + Both visual and interactive displays of webpages
+ Are quicker to produce and quicker to refine + Highly testable
– You don’t get an idea of how a customer would actually feel using it – Takes additional time to create interactions and link pages
– Can only be tested based on opinions of how it would feel to use – Can require skills outside of your existing design skillset


Using interactive prototypes, you allow your team and customers the chance to test the user experience and gather feedback unlike with static templates. What works? What doesn’t? This way, you can identify usability issues and service gaps before you commit to costly development work.

How do you conduct user testing you ask? User testing can be done through existing customer recruitment (e.g. recruit via your newsletter for a screenshare study or invite people to give feedback through your site/app) or sites like UserTesting for those who want to find candidates that match your target audience’s criteria. By using a combination of ‘can you do this’ tasks and feedback questions on what they see, you can access valuable insights that can be factored into your designs prior to formalising your specification, minimising future costs and ensuring good user experiences first time.

Tip: Design Sprints

To streamline steps 4 and 5, use Design Sprints to gather insights and test website concepts fast. Design Sprints can ultimately deliver actionable insights that can get you to the development phase in just a week. Check out our Design Sprints process overview here for a taster of what it covers.


Tip: Iteration

Iteration at this stage is key. If you can continue to refine your designs based on user feedback, you’ll be more likely to launch a successful product. As development of custom sites can take 1-2 months, taking the time to perfect your designs can mean your not going back to the drawing board later with a lower budget.

6. Development, Testing and Launch

Once you’re happy with your prototypes and the user feedback, you can now begin building your website. After selecting a site builder (WP Beginner has a great resource comparing platforms here), you can set your internal design or agency team to work, building screens and interactions based on your prototypes.

This involves:

  • Building your customer facing front end
  • Customising your admin side to enable site management and content creation
  • Integrating third party APIs and plugins to assist in maintaining site security and functionality. E.g. a forms provider

Post-build, we recommend thoroughly testing your redesigned website. This could be through internal testing or hand picking site users to see if they can achieve specific tasks, e.g. checkout.

If there are areas to improve, you can hold off on go live. Otherwise, let’s take your experience online!

Tip: Transition Designs in Figma to a HTML Site Faster

If you’re building your web templates in Figma, you can use the web builder Webflow to move your templates across extremely quickly. Check out how the plugin works for Figma and Webflow here.


Tip: Try Agile Development

A Sprint mentality to development can be used to structure website builds. SCRUM can be used to breakdown mammoth multi-month projects into week long bites, ensuring teams can focus on areas and achieve goals at speed. Check out Atlassian’s post on the Scrum methodology here.

7. On-Going Monitoring and Feedback

Launching a freshly redesigned website is not the end. In fact, it’s the beginning. You’ve tested on a small version of your target audience, but now you’ll be able to gather broader analytics from your audience as a whole.

It will also help you determine if you’re meeting your goals in step 2 and are delivering an excellent user experience.

Here are some of the basic tools you should be using to monitor your website’s performance:

  • Google Analytics – User analytics
  • Search Console – Site monitoring that help identify issues
  • Heatmaps and recordings – See how real users are navigating your site and identify ways to improve experiences. (Discover more about the benefits of heatmaps here)

With this data, you can conduct regular reviews of performance and continue tweaking pages and interactions for the best results.

Download your free Design Sprint Guide graphic

Continue Learning…